Chinese Soul Food by Hsiao-Ching Chou Cookbook Review @SMGurusNetwork
Book Reviews, Food & Beverages, For Foodies, Gift Guide, Home, Main Dishes, Recipe, Reviews, shopping, Side Dishes, Spring / Easter

Chinese Soul Food by Hsiao-Ching Chou Cookbook Review

If you are not new to my blog you probably know how much I love to cook. That’s why I was thrilled when I was contacted to see if I would check out Chinese Soul Food by Hsiao-Ching Chou and share recipes with you. I love cooking food from other cultures, and Chinese food is definitely one of my favorite cuisines to both cook and eat. So I couldn’t wait to take this book for a spin.

I immediately loved that it’s a hardcover! This cookbook starts off with a section on key ingredients, techniques, and equipment. I really enjoyed this section of the book since it will show you everything you need to successfully recreate any of the recipes in the book. Another thing I really liked was how vibrant the pictures are throughout the book. Te pictures draw you in and make you want to make the recipe. Everything looks absolutely delicious in this book. If you like Chinese soul food and want to make it at home, this is the book for you!
Here are two absolutely delicious recipes from Chinese Soul Food author Hsiao-Ching Chou for you to give a try.

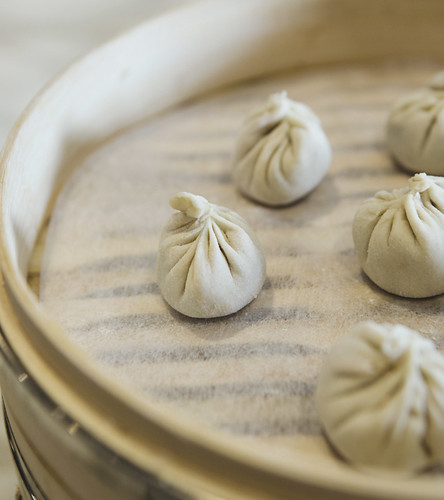
Chou_Soup Dumplings_Photography by Clare Barboza
*(c)2018 by Hsiao-Ching Chou. All rights reserved. Excerpted from My Rice Bowl by permission of Sasquatch Books.
Soup Dumplings – (Xiao Long Bao)
MAKES ABOUT 40
For the gelatin: 2 pounds unsmoked, skin-on pork hock (see note, page 109) ½ pound pork skin (recommended, but optional) 1 pound chicken carcasses, if available, or parts such as drumsticks and wings 2 stalks green onions, cut into 3-inch segments 3 slices fresh ginger ¼ cup soy sauce ¼ cup Shaoxing wine or dry Marsala wine Kosher salt 3 quarts water, plus more as needed
1 (¼-ounce) envelope Knox gelatin (optional)
For the dough: 2 cups all-purpose flour, plus more for dusting ½ cup bread flour ¾ cup plus 1 tablespoon hot water (150 to 160 degrees F)
For the filling: 1 pound ground pork 2 tablespoons soy sauce 2 stalks green onions, finely chopped 1 teaspoon grated or finely minced fresh ginger 1 teaspoon white pepper powder 1 teaspoon sesame oil
Black Vinegar with Chili-Garlic Sauce (recipe follows), or black vinegar and finely julienned fresh ginger, for serving
1. To make the gelatin, put the pork hock, pork skin, chicken carcasses, onions, ginger, soy sauce, wine, and salt to taste in a stock pot. Add the water, adding more as needed to make sure it covers all of the ingredients. Bring to a boil over high heat and then reduce the heat to low. Simmer for 2 to 3 hours, or until the broth is reduced by at least half and the consistency has thickened from the collagen; it will resemble a slurry. You will have to check it from time to time and gently shift the hocks and chicken to prevent any sticking. After 2 hours, add additional salt to taste. Let cool slightly and strain the broth into a 2-quart glass baking dish (or other similar heatproof container). Let the broth cool to room temperature, cover, and then chill in the refrigerator overnight. The gelatin should be quite firm. If it’s not, it will make your filling too damp and very challenging to use.
2. If, the next day, the gelatin still jiggles when you shake the pan, here’s how to correct it: In a pot over medium heat, melt the gelatin. Add the Knox gelatin into the broth gelatin, and stir to dissolve. Transfer to the baking dish and chill until firm.
3. Cut the gelatin into ¼-inch dice and place in a medium bowl. Cover with plastic wrap and set aside in the refrigerator.
4. To make the dough, put the flours in a large bowl, and stir to combine. Gradually add half the water while stirring with a spatula or a pair of chopsticks. As the dough comes together, add more water. You may or may not need all of the water. Press the dough together; if you can form a ball, you can stop adding water. Form a ball and knead the dough for about 4 minutes, or until smooth. Cover the bowl with a damp towel and let the dough rest for 30 minutes at room temperature.
5. To make the filling, in the bowl of a food processor, put the pork, soy sauce, onions, ginger, and pepper. Pulse about five to six times to mix the meat and to create a fluffy texture. Add the oil and the gelatin. Pulse two to three times just until the gelatin becomes incorporated. Do not over process or the filling will become too pasty. Transfer the filling to a medium bowl, cover with plastic wrap, and set aside in the refrigerator until ready to use.
6. Line a baking sheet with parchment paper and set aside. Line the steamer baskets with perforated parchment paper and set up the steamer.
7. On a lightly floured work surface, knead the dough again for 2 minutes, or until smooth. Divide the dough into two portions. Cover one half with a damp towel. Roll the other half into a rope about 1 inch in diameter. Cut rope into pieces about 1 inch long or about 10 grams each. With a Chinese rolling pin (dowel), roll out each piece of dough into a 3.-inch round. Place about 1 tablespoon of filling in the center of the wrapper. Gather the edges and twist into a “topknot” above the center of the dumpling. Place each dumpling in the steamer basket, leaving about 1 inch of space between dumplings. Repeat with the remaining dough and filling. If you don’t have enough steamer baskets, place the sealed dumplings on the lined baking sheet.
8. Steam the dumplings (see page 65) over high heat for 6 to 8 minutes, depending on the size of the dumplings. When done steaming, the dough will transform from opaque to slightly translucent.
9. Serve immediately, straight from the basket, with the chili-garlic sauce.
Black Vinegar with Chili-Garlic Sauce
MAKES ABOUT ½ CUP
½ cup Chinese black vinegar or balsamic vinegar 1 tablespoon chili bean sauce 2 large cloves garlic, finely minced or crushed 1 teaspoon soy sauce
• In a small bowl, combine the vinegar, bean sauce, garlic, and soy sauce. You can store this sauce in the refrigerator for up to 1 week.
How To Eat A Soup Dumpling
You have to eat a soup dumpling while it’s still steaming hot. You need a pair of chopsticks, a sauce dish with black vinegar and ginger, and a Chinese soupspoon or other deep spoon. Gently use your chopsticks to lift the soup dumpling by the topknot. Be careful not to puncture the skin to avoid spilling out the melted gelatin, which is now the eponymous soup. Quickly dip the dumpling in the vinegar-ginger sauce and then place it in your spoon. Take a small bite from the top of the dumpling and suck out the soup, being cautious of the potentially scalding temperature. Then eat the rest of the dumpling. Some people take a bite first and then spoon in some dipping sauce. It’s up to you. Personally, I prefer to put the entire soup dumpling in my mouth so that when I bite into it, the soup and dumpling create the perfect bite. That, however, takes skill to keep from burning your tongue.

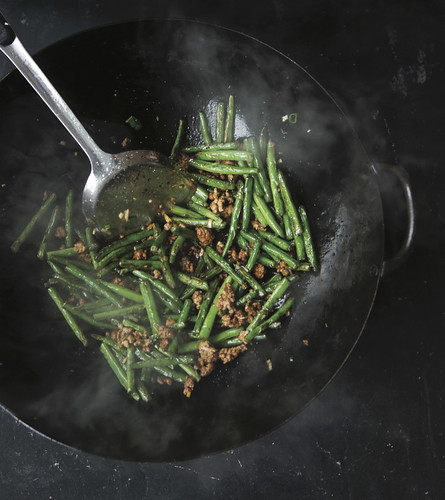
Dry-Fried Green Beans_Photography by Clare Barboza
*(c)2018 by Hsiao-Ching Chou. All rights reserved. Excerpted from My Rice Bowl by permission of Sasquatch Books.
Dry-Fried Green Beans
MAKES 4 SERVINGS
¾ pound green beans (haricots verts or regular) ⅓ cup plus 1 tablespoon vegetable oil, divided 4 ounces unseasoned ground pork or ground beef (about ¼ cup) 1 stalk green onion, finely chopped 1 tablespoon minced fresh ginger 1 large clove garlic, finely minced 2 tablespoons soy sauce, plus more as needed 1 tablespoon water 1½ teaspoons sugar
1. Trim the green beans and cut them in half. Line a baking sheet with a few layers of paper towels. Set aside.
2. Preheat a wok over medium-high heat until wisps of smoke rise from the surface. Add ⅓ cup of the oil and heat for 30 to 60 seconds, or until it starts to shimmer. In batches, add the beans to the oil in a single layer. Quickly stir-fry the beans, gently swishing them around in the oil. The skins of the beans will start to blister. Once you see that most of the beans look lightly wrinkled but not necessarily browned, about 1 to 2 minutes, using a slotted spoon, transfer the beans to the prepared paper towel–lined baking sheet to absorb the residual oil. Repeat with the remaining beans. Use a wad of paper towels to absorb any residual oil in the wok and brush away any charred pieces.
3. Return the wok to the stove over high heat, and add the remaining 1 tablespoon oil. Add the pork and, using a spatula, break up the pork. Stir-fry for 1 to 2 minutes, or until brown and cooked through. Add the onions, ginger, and garlic, and stir and toss for a few seconds to combine. Add the soy sauce, water, and sugar, and stir to combine.
4. Add the beans, and stir and toss for a few seconds to combine. If it doesn’t taste salty enough, add an additional splash of soy sauce, and stir to incorporate. Serve with steamed rice.
Take a look at all our Spring/Easter gift ideas by clicking on the image below.
Are you looking to gain more exposure for your Brand OR Products this year? My Silly Little Gang has many perfect opportunities for you! For more information click here.

I really like Chinese food, but I’ve never tried making it myself. The fried green beans sound interesting, and I know I love dumplings. I’d love to try these recipes.
I love how you describe the soup dumplings and the correct way of eating them, omg they sound delicious!
This is definitely a cookbook that I would love to have! I have always wanted to make Chinese from scratch. 🙂 Thanks for sharing!
I am so in love with the recipes I have tried from this book! 🙂